
Digital transformation in education starts with data, not with learning apps or digital tools. And for most schools, that information is (or should be) stored in a Student Information System (SIS).
But many schools, colleges, and universities have trouble with the actual SIS implementation. There are many reasons, but bad planning, rising data migrations, unclear ownership of the tool, and bad integrations turn what should be a strategic upgrade into an operational nightmare.
This guide shows how to set up a Student Information System step by step, using best practices from top schools around the world. This article will help you avoid costly mistakes and make the most of your return on investment (ROI), whether you’re setting up a SIS for the first time or replacing an old one.
Benefits of Using a Student Information System
Before looking into the benefits of a Student Information System (SIS), it’s important to understand what success really means for a school. Today, success is more than just the number of students enrolled. It also includes better communication, more accurate student data, and better academic results. A modern Student Information System helps schools and universities centralize student records, automate workflows, cut down on mistakes made by hand, and make decisions based on data that improve efficiency and the student experience on a large scale.
Important SIS Benefits for Schools and Colleges
Effect of SIS Implementation on Administration
| Area | Impact |
| Reduction of up to 40% in manual administrative work | Automating routine tasks can cut down on manual administrative work by as much as 40%. |
| Correctness of Data | One place to find all the information about a student |
| Following the rules | Audits and regulatory reporting that happen faster |
| Productivity of Faculty | Grading, attendance, and scheduling done automatically |
| Experience of the Student | Access to academic and fee information in real time |
Gartner says that companies that fully use SIS platforms have report cycles that are 30 to 50% faster and a lot fewer data errors.
Step for letting student information system implementation process by student detail or other criteria
If the setting is set up so that each student meets their own access requirements, they can be let in by themselves and add and drop classes on their own. Alternatively, they can be let in as part of a group with other students added by their advisor. This is the most important and most asked-about part of the journey.
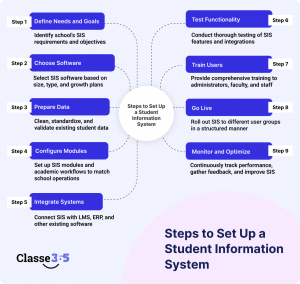
Steps to Set Up a Student Information System
Step 1: Figure out what the student information system needs and what its goals are.
First: Find out why your school needs a Student Information System.
Clearly define: Pain Points for Academics and Administrators
Modules needed: admissions, attendance, tests, fees, and reporting
Time saved, better data quality, or faster data reporting are some examples.
This is a key step in making sure that the SIS meets the institution’s goals and objectives, not just its technical needs.
Step 2: Choose the best software for your student information system
Pick SIS software that works for your school’s size, type, and plans for growth.
Important criteria for assessment:
- Student Information in the Cloud The design of the system
- Ability to grow as enrollment increases in the future
- Built-in features for compliance and reporting
- SIS can work with LMS, ERP, and financial systems.
- Past work with these kinds of institutions by vendors
It’s smart and cost-effective to buy the right SIS solution the first time. In the end, this will lower long-term
Step 3: Getting ready, cleaning, and moving the student
The most important part of setting up any SIS system is the data migration process.
Before moving:
- Check the student records that are already there.
- Get rid of duplicate and old data
- Make the ID, Name, Grade, and Date fields the same.
- Check the data with both academic and administrative staff.
The new Student Information System has data that is correct, compliant, and reliable.
Step 4: Set up the SIS modules and the academic workflows
Set up the SIS so that it works with how the school runs.
This includes:
- Terms, courses, and credits in school
- Rules for attendance and grades
- Workflows for testing and grading
- Billing cycles and fee structures
- Roles and access rights for users
Configuration should start with the most important workflows and add more advanced customization later.
Step 5: Put SIS together with LMS, ERP, and more.
A modern Student Information System must work perfectly with the tools that are already in place.
Some common integrations are:
- Learning Management Systems (LMS)
- Software for finance and accounting
- CRM systems for admissions
- Platforms for HR and payroll
Integrating SIS removes the need for manual data entry, cuts down on mistakes, and makes a single data ecosystem.
Step 6: Check the Student Information System’s functionality and accuracy
Testing should happen before the launch.
Testing should have:
- How the system works
- How accurate the data is after migration
- Flow of integration data
- Access and permissions based on roles
Using user acceptance testing with real employees will make sure that the SIS works in real life.
Step 7: Teach administrators, faculty, and staff how to use SIS
Training that works leads to using the SIS system.
Here are some best practices:
- Training sessions based on roles
- Walkthroughs of the system in person
- Clear instructions and paperwork
- Ongoing support options
Users who are well-trained make fewer mistakes and get the most out of the Student Information System.
Step 8: Set up the SIS and go live
Use a structured rollout plan to start the SIS.
Suggested course of action:
- Start with the administrative teams
- Next, give it to the faculty.
- Last, turn on the student and parent portals.
Clear communication during deployment keeps things running smoothly and without confusion.
Step 9: Keep an eye on performance and make the best use of SIS
After go-live, SIS implementation goes on.
Areas of focus after implementation:
- Keep an eye on KPIs like how accurate attendance is and how long it takes to report.
- Keep an eye on how people use and adopt the system
- Get feedback from users
- Improve configurations and workflows
Continuous optimization makes sure that the Student Information System will pay off in the long run.
Getting ready to use the Student Information System
Planning is 80% of a successful SIS implementation, and technology is 20%. Most of the time, institutions that skip this step run into problems with adoption and delays.
Set SIS implementation goals and key performance indicators (KPIs).
Before you choose software, make sure you know what success means:
- Cut down on administrative hours?
- Make attendance more accurate?
- Allow academic reporting in real time?
- Do you support LMS and finance integrations?
Some clear KPIs could be:
- How long it takes to make reports
- Rate of accurate attendance
- Time it takes to process enrollment
- Metrics for staff adoption
Put together a team from different departments to implement SIS
A good SIS project team should have:
- Academic managers
- IT management
- Teams for admissions and registration
- Representatives from finance
- Faculty champions
Don’t think of SIS implementation as a “IT project.” It’s a change that affects the whole institution.
Check the systems and data you already have
Do a data audit before moving:
- What kinds of information do we have about students?
- Where is it kept?
- What information is old or repeated?
- What kinds of formats are being used?
This step has a direct effect on how well the data migration goes.
Checklist for Implementing a Student Information System
Checklist for Before Implementation
- Goals and KPIs set
- Stakeholders are on the same page
- The data audit is done.
- Mapped out integration needs
Checklist for Going Live
- Data checked
- Trained users
- Team ready to help
- Plan for rollback made
Checklist for After Implementation
- KPIs tracked
- Collected feedback
- Made a roadmap for optimization
Common Problems with SIS Implementation (and How to Fix Them)
Mistakes in moving data
Solution: Clean data early and check it with the departments.
Not wanting to change
Solution: Get users involved early and show them the benefits.
Complexity of Integration
Choose SIS platforms that have open APIs as a solution.
Going over budget
Plan the total cost of ownership, not just the cost of licensing.
Cost and return on investment (ROI) of SIS implementation
Institution size is one of the things that affects SIS cost.
- Needed modules
- How hard it is to integrate
- Needs for training and help
Common SIS ROI Indicators
| Metric | Effect after implementation |
| Hours for Admin | ↓ 30–50% |
| Time to Report | 40% |
| Errors in Data | 60% |
| Staff Happiness | ↑ a lot |
The effect of SIS implementation in the real world
According to McKinsey, schools that use centralized SIS platforms get:
- Keeping more students
- Making decisions faster
- Better following of the rules
- More efficient operations
What Makes Classe365 the Best SIS for Putting It into Action?
We made Classe365 with a lot of knowledge about modern, data-driven schools and classrooms.
Main Benefits
- A single platform for SIS and LMS
- Cloud-native and able to grow
- Dashboards and analytics in real time
- Integrations that work without a hitch
- Experience with global implementation that has been proven
Classe365 works with schools, colleges, universities, and multi-campus institutions that are part of different regulatory groups.
FAQ’s
How do I make a system for student information?
The best way to do this is to implement it in phases, with clear goals, a smooth data migration, and good communication with all stakeholders.
When will the SIS be put into place?
Most SIS solutions take between 3 and 9 months to set up. Depending on how big and complicated the organization is.
How do I set up SIS?
Planning and choosing software; 2) Moving data; 3) Setting up and integrating; 4) Training; then going live with your new system and optimizing/reviewing it.
Is it possible to connect SIS and LMS?
Yes. Today, SIS platforms, especially fully integrated systems like Classe365, work with LMS tools to automatically keep track of enrollments, grades, and attendance.
Should small schools have a system for keeping track of student information?
Yes. Centralized data, automation, and being ready for compliance help small businesses.
What makes SIS different from software for managing schools?
The SIS is the main system of record, and the school management software often has extra features for running the school.